

What Are The Beads Around The Base Of A Cake Called.
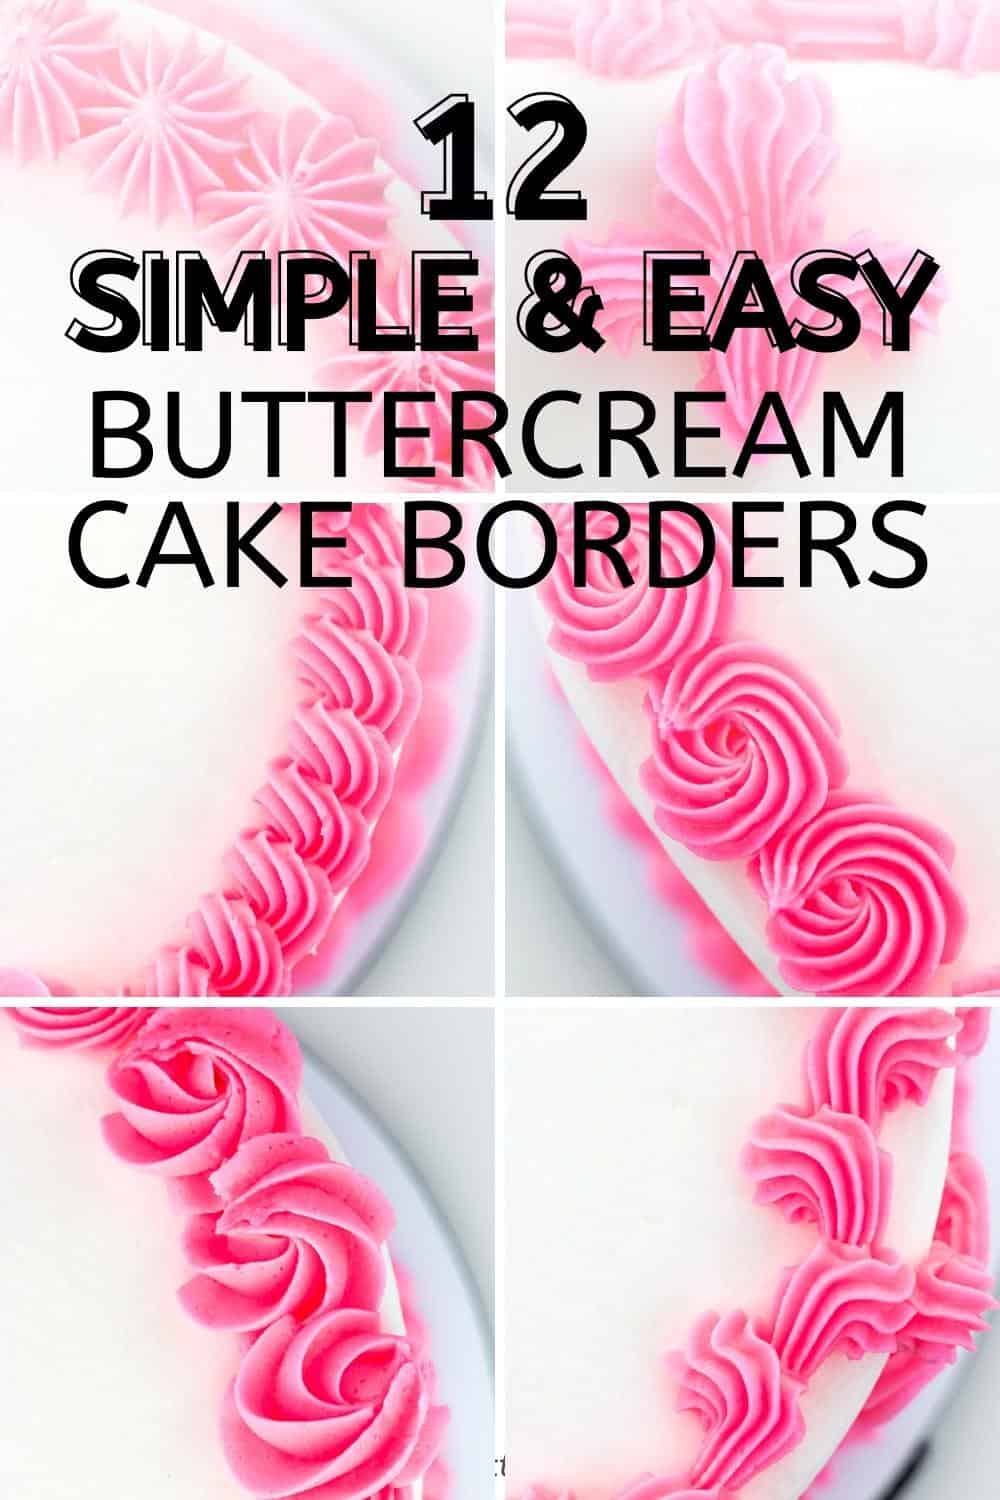
Learn cake decorating piping techniques with these 12 uncomplicated and easy buttercream cake borders. Piping cake borders can really be easy with these unproblematic icing designs.
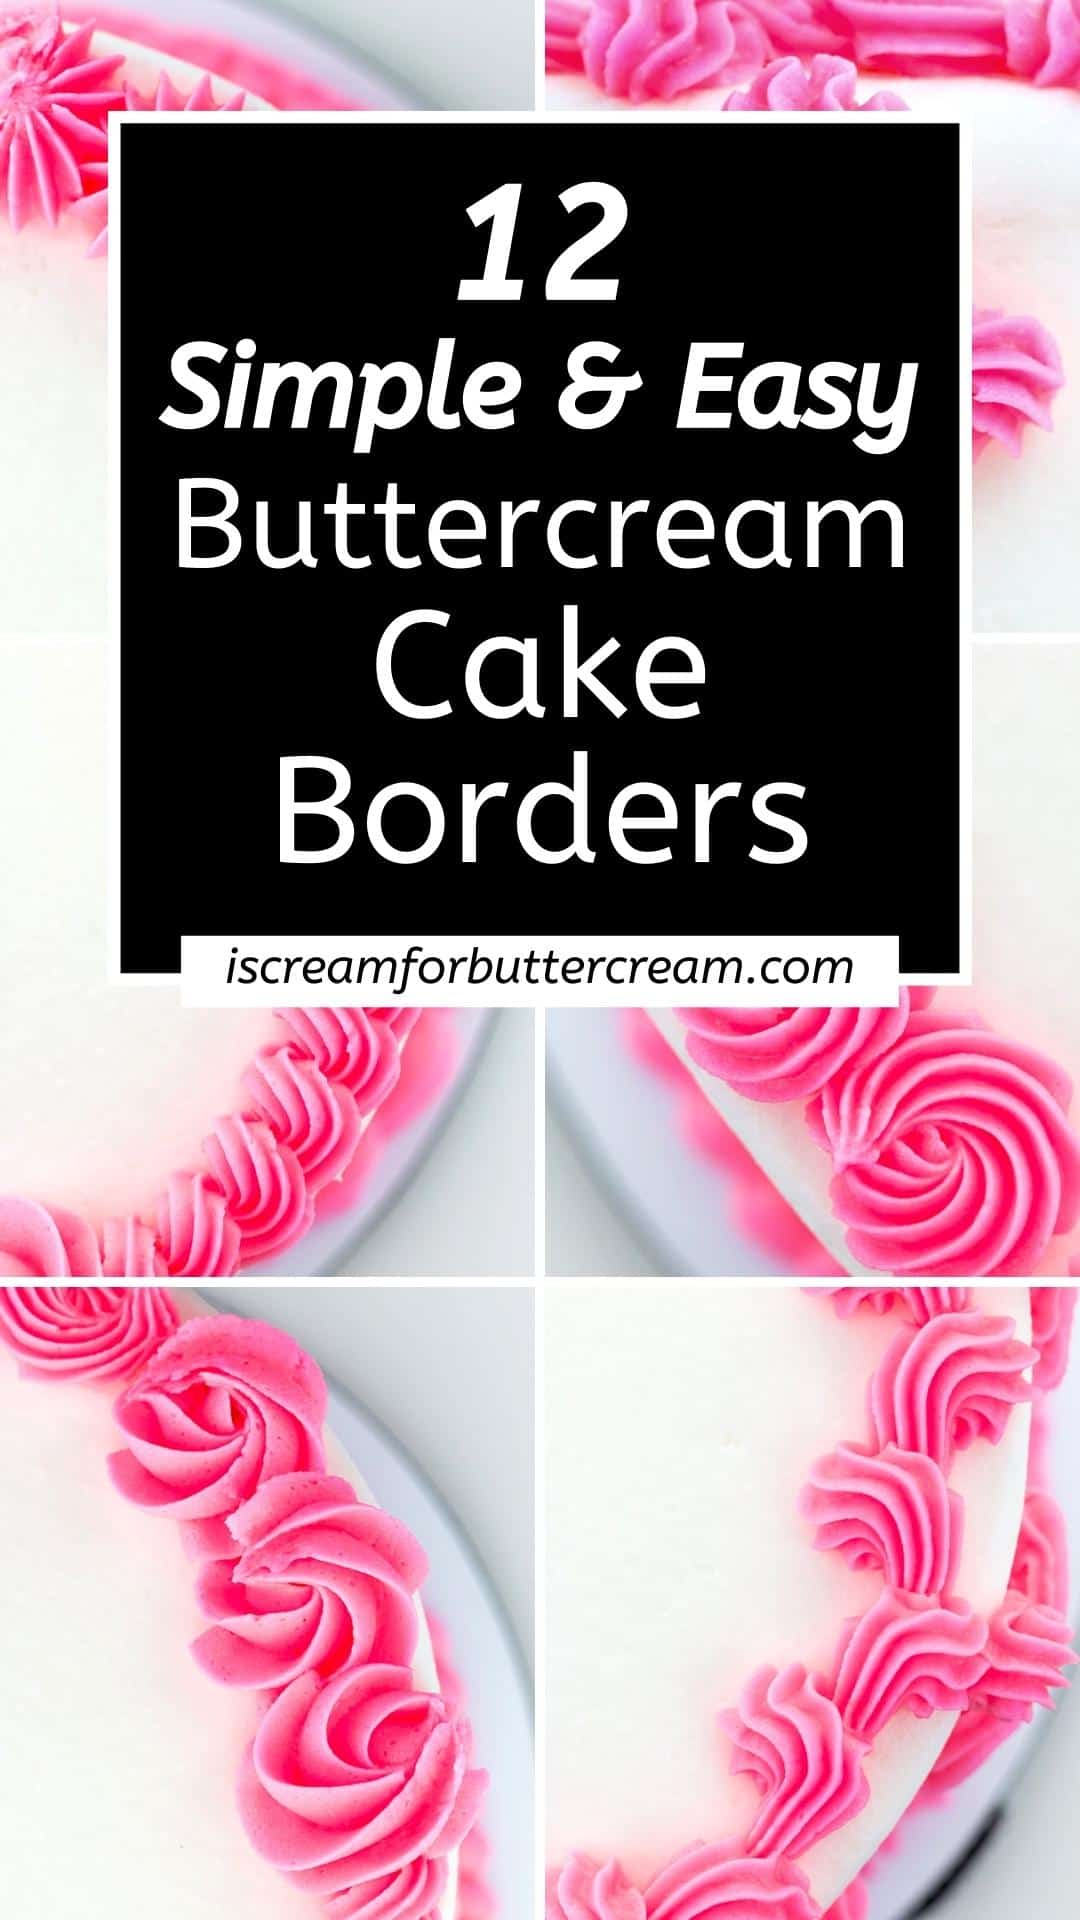
Learn how to pipe a cake using twelve unique buttercream borders with this step-by-step, piece of cake to follow tutorial. Plus there's even a free printable cheat sheet for reference.

Today I want to go through twelve really simple buttercream border designs. Most of these are classic edge designs, only they can easily exist done past a beginner.
So if that'south you, you're in luck. Y'all tin go a archetype cake design without needing a ton of experience.
This mail contains affiliate links. Equally an Amazon Associate, I earn from qualifying purchases.
Jump to:
- Supplies for piping borders:
- Small crush border:
- Large shell border:
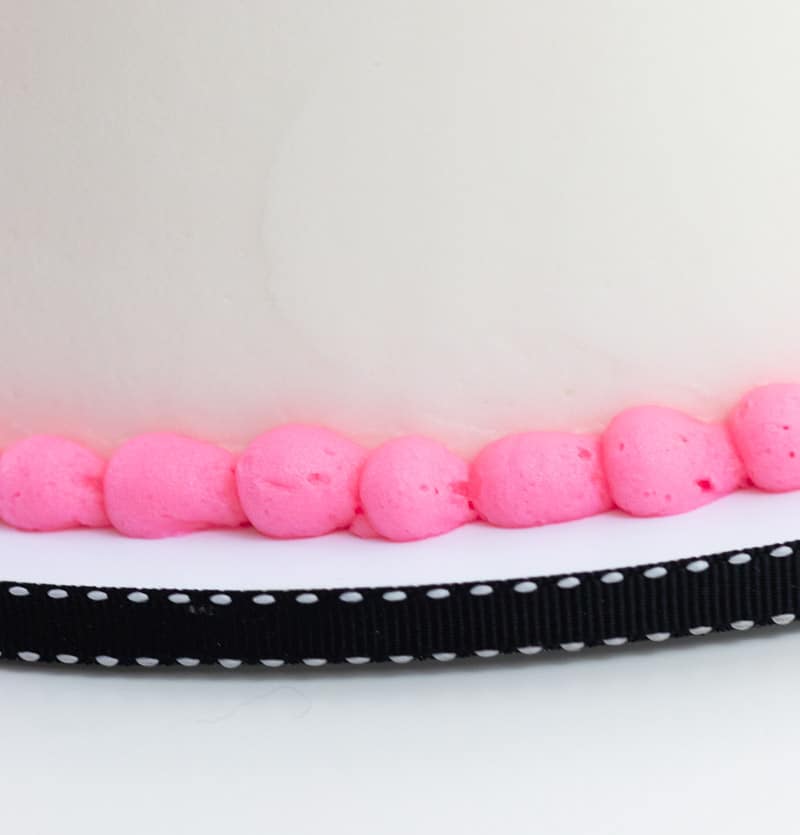
- Round pearl edge:
- Crush pearl (Scallop) edge:
- Star border (large or small):
- Swirl border:
- Rosette border:
- Dollop edge:
- Leaf edge:
- Fleur de lis border:
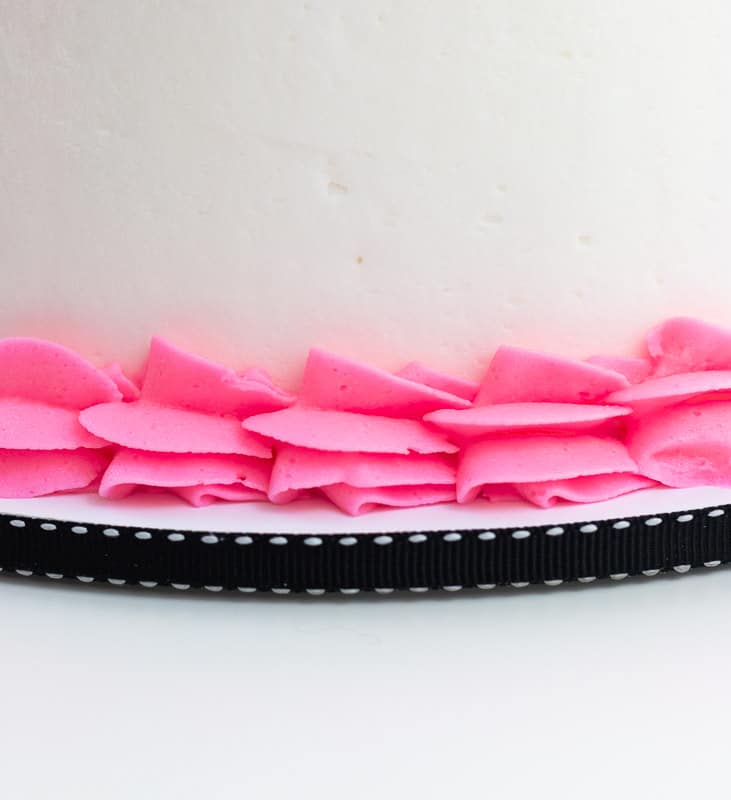
- Ruffle border:
- Contrary beat out border:
- Helpful tips for Pipe Borders:
- FAQs for Pipage Borders:
- Printable Cheat Sail:
- Video:
- Other posts you might like:
You lot don't have to go these exact tips. You lot can use different sizes or dissimilar brands if you lot desire.
These are just tips that I usually accept on hand and that I use most often. Change things upward and experiment to come across what size you like your borders.
Everything is likewise in a step-by-step, easy-to-follow tutorial video beneath, but for now, let'south go through each of the twelve borders, so you'll know what they're called and a flake of full general information about each ane.
Before we get too far along, I desire to let you know that I've also got a downloadable printable cheat sheet for all these borders and the icing tips y'all'll demand…it'south close to the bottom of the mail.
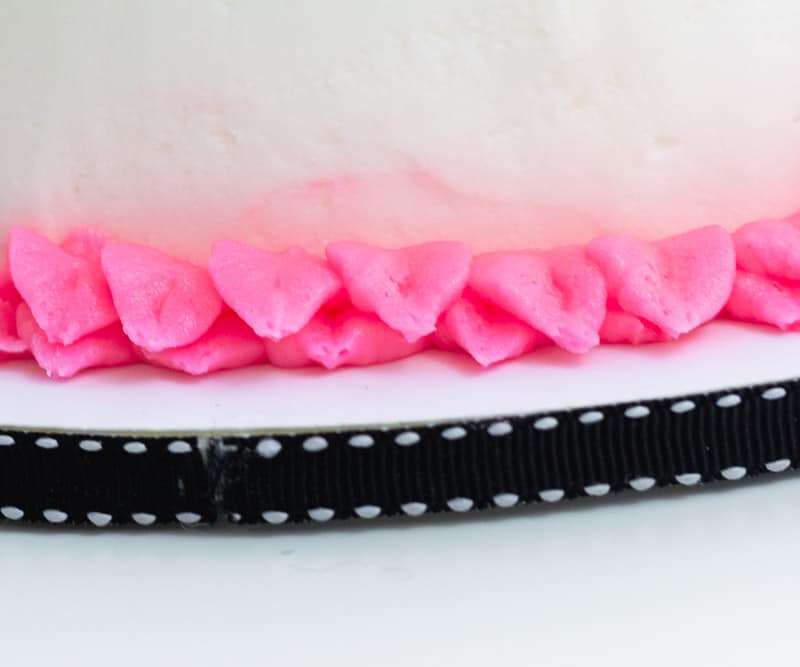
Small vanquish border:

This i y'all've probably seen a gazillion times, but there is a reason for that. It'south simply classic and works well with almost everything.
You lot tin can make large shells or small shells, depending on your cake design.
For this type of border, you lot can use a Wilton tip 21 (used in the video) or Wilton tip 32 which also works, or you can just get a gear up of both.
To pipe the small shell edge:
- Concur the piping pocketbook at an angle, squeeze & permit the icing mound up a bit, and then stop squeezing as hard and simply pull the pipe bag toward y'all.
- Pipe some other crush starting right later on the mounded area on the shell that was just piped.
- Y'all can spread the shells further apart if y'all like.
Big shell border:
This 1 is just a larger take on the average shell edge. This would normally be done on the bottom of the cake since information technology'south quite large.
This could work for the tiptop of the cake, but you lot'd want to brand certain the bottom border is at least as big as the top, otherwise, the cake volition wait top-heavy.
For this type of border, yous can use a Wilton tip 1M or 4B.
To pipage the large vanquish border:
- Yous'll pipe this one the aforementioned way y'all pipage the small shell border, only the shells volition be bigger since you're using a larger piping tip.
Round pearl border:

This 1 is pretty archetype as well and actually easy to do.
For this type of border, you can use a Wilton 12 round tip, or a #5 circular tip for a smaller pearl.
To pipe the round pearl border:
- Hold the piping page at a direct 90-degree angle and clasp a small amount of icing out. Release the pressure and pull your pipe handbag away from the cake.
- Once you pipe the pearls, you well-nigh always have icing sticking upward into a point on each pearl. The play a trick on for that is to add a scrap of water to your finger and gently tap down that icing point.
- You lot'll need to add together a bit more water to your finger about every third pearl, simply information technology works like a charm.
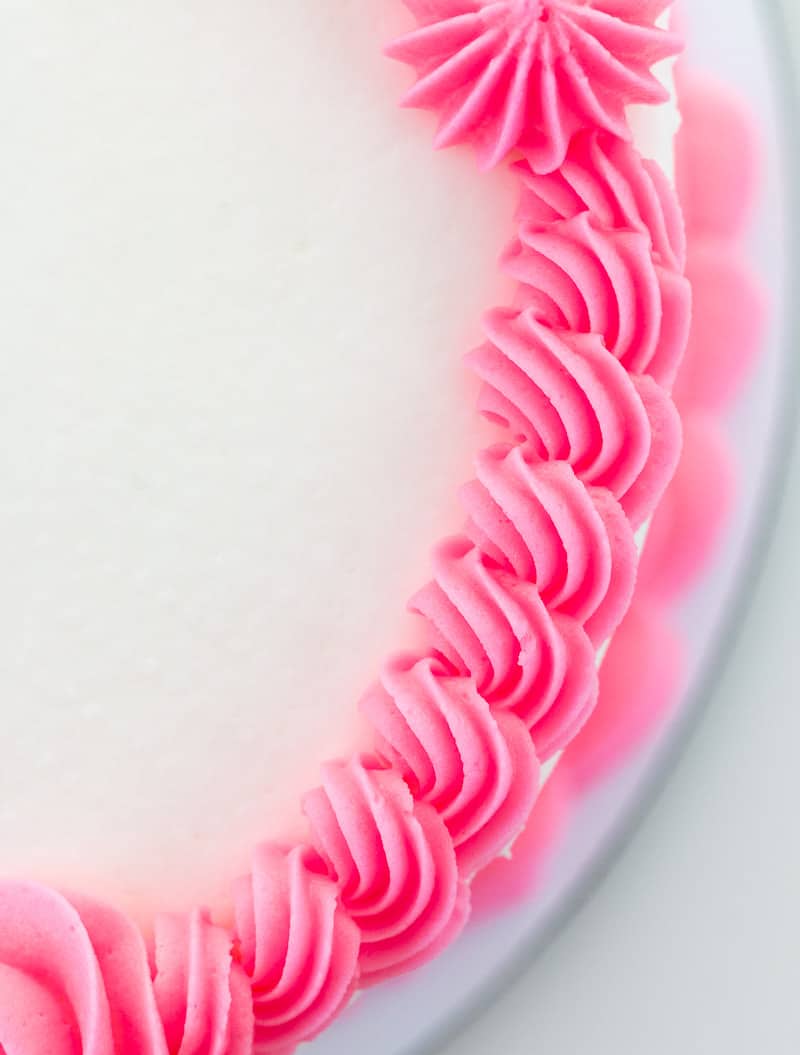
Trounce pearl (Scallop) border:
I've always called this one the shell pearl, but information technology'due south really not a beat, since y'all don't employ the star tip. I think the right term is the scallop border.
It's substantially the aforementioned concept as the beat out edge, just you use a circular tip instead of using a star tip.
For this type of border, you can employ a Wilton 12 round tip or a #5 for a smaller edge.
To pipage the scallop border:
- You'll do the same technique every bit the small trounce border above, but y'all'll be using a round tip instead of a star tip.
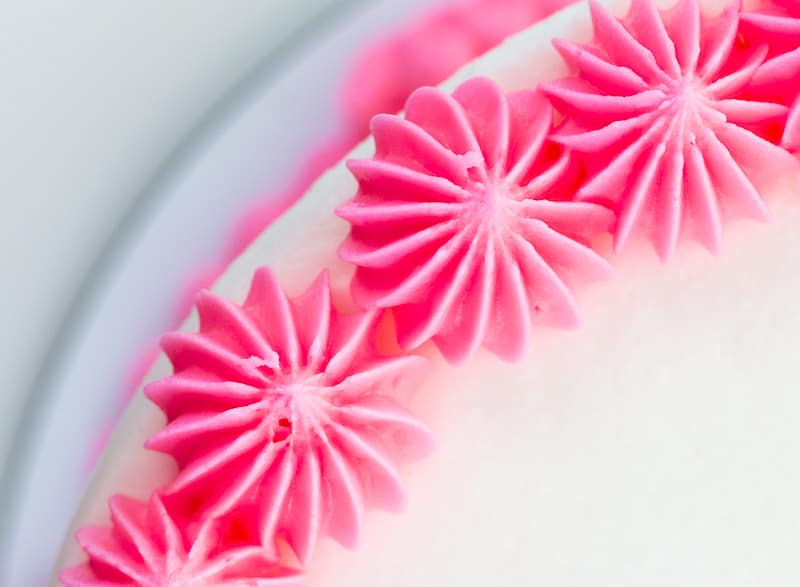
Star border (large or pocket-sized):
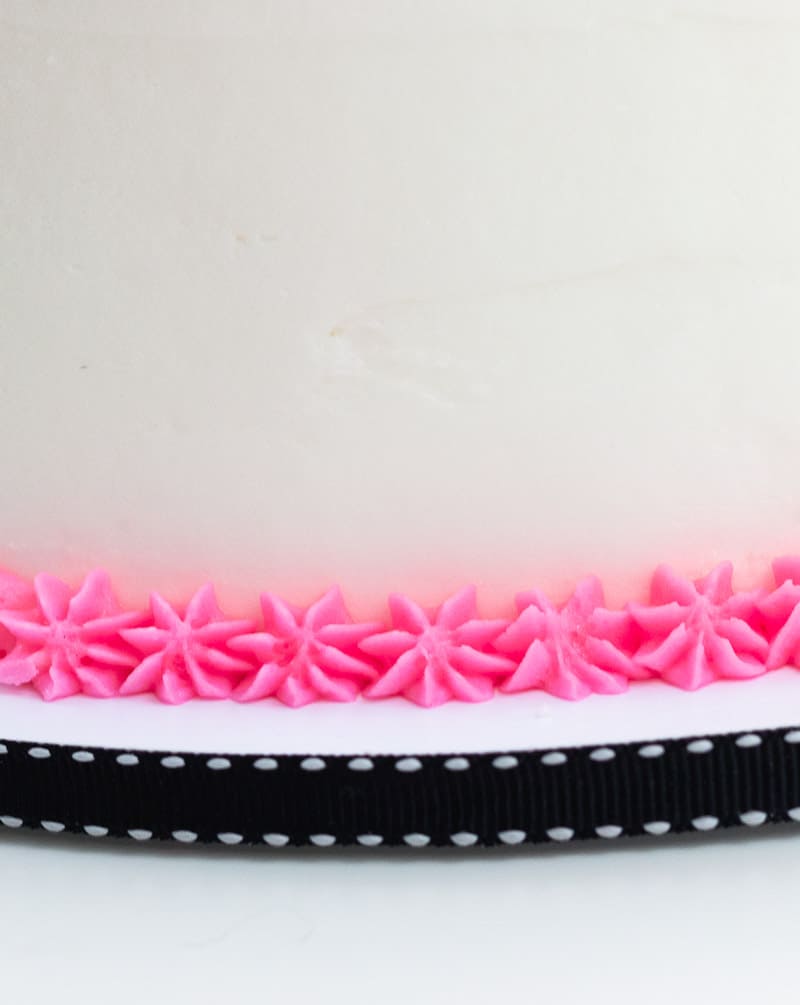
These are really simple as well and for some reason, they just scream 'party cake' to me. They just seem fun.
You tin even mix and match the sizes of stars if you want to get fancy.
For this type of border, you lot can use a Wilton 21 tip or 1M
To pipe the star border:
- Agree the piping bag at a directly ninety-degree angle and squeeze. Release pressure and pull the piping bag away from the cake.
Swirl border:
I love this one. It really looks pretty on a cake. You lot can even take information technology upward a notch by swirling different buttercream colors together and so piping it onto the cake.
You can do small or large swirled borders every bit well and this border looks good as a meridian or bottom block border.
For this type of border, you can employ a Wilton 1M, 4B, or 21 tip, or really any star tip would work equally well.
To pipe the swirl border:
- Hold the piping bag at a bit of an angle and squeeze with abiding pressure equally you motion your piping pocketbook in a swirling mode.
Rosette edge:
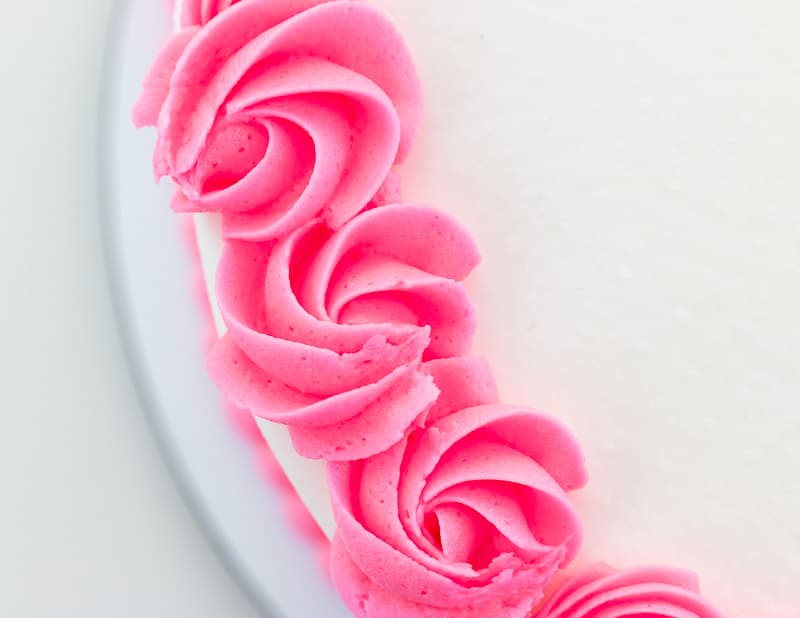
This one is upward there with the swirl edge as i of my favorites. It just makes for such a pretty block and information technology's and then simple to practice.
Y'all tin alter the sizes up or tip on this one equally well to get a different look.
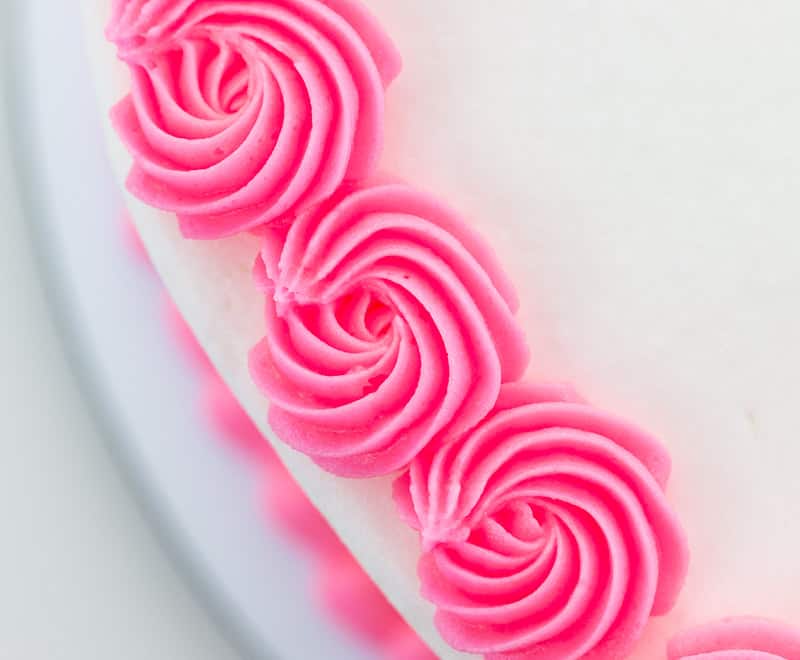
For this border, you can utilise a Wilton 1M or 2d or 21 tip.
To pipage the rosette border:
- Y'all tin can exercise this a couple of unlike ways.
- You can pipe a rosette past starting on the outside of the rosette and swirling toward the inside… which gives y'all the archetype rosette look.
- You tin besides pipe rosettes by starting in the eye and swirling outward… which gives you the look of a rose.
- Using different tips volition requite yous a different look as well.
- This 1 is fun to experiment with and it looks good equally a top and lesser cake border.
If you desire more in-depth educational activity for piping rosettes, you can see this mail service here: Better Buttercream Rosettes
Dollop border:
I have no idea whether the word 'dollop' is even an bodily word, but that's what I call these things.
They're just basically fluffy puffs of buttercream. They're uncomplicated and actually requite the cake a finished expect.
For this edge, yous can use a Wilton 6B or 8B. You can besides apply a very large round tip. This technique works all-time with a very large open piping tip and with softer icing.
To pipe the dollop border:
- This border looks all-time on top of the cake.
- Hold the piping pocketbook at a direct 90-degree angle from the cake. Squeeze and let the icing mound up a flake, then release the force per unit area and pull the piping bag direct up. It should form a nice point at the top.
- This technique works best with a very large open piping tip and with softer, fluffier icing.
Leafage border:
This ane is fun and a fiddling flake different. You lot can build upwards the leaves on the bottom of the block by piping more rows.
For this border, yous tin can use a Wilton 352 leaf tip.
To piping the leaf border:
- You lot'll need to hold the pipe bag at virtually a xc-degree bending from the cake, but tilt the tip upwards and your hand downwards just a bit.
- Make sure the points of the icing tip are on the peak and lesser, not the sides.
- Squeeze and let the icing mound up just a bit. Release pressure and pull abroad from the cake and downwardly a bit.
- You lot tin can pipe one row effectually the bottom of the block and so become and pipe on another one to a higher place information technology to give it a layered expect.
- You can also use larger leaf tips to get larger leaves.
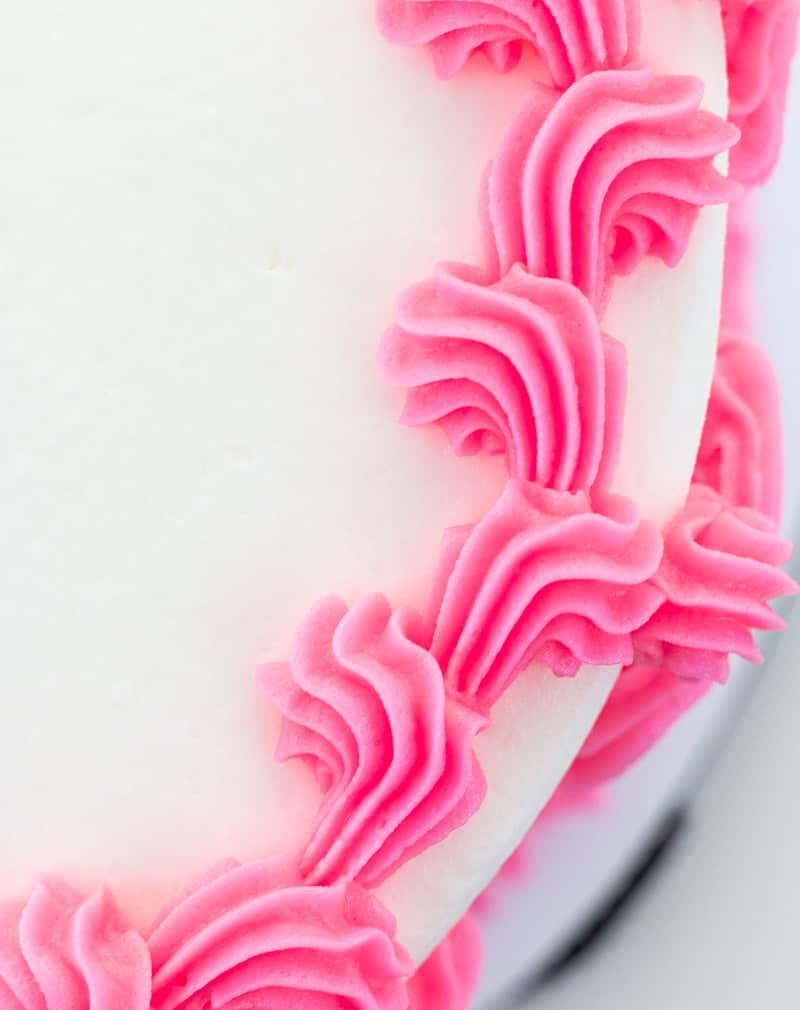
Fleur de lis border:
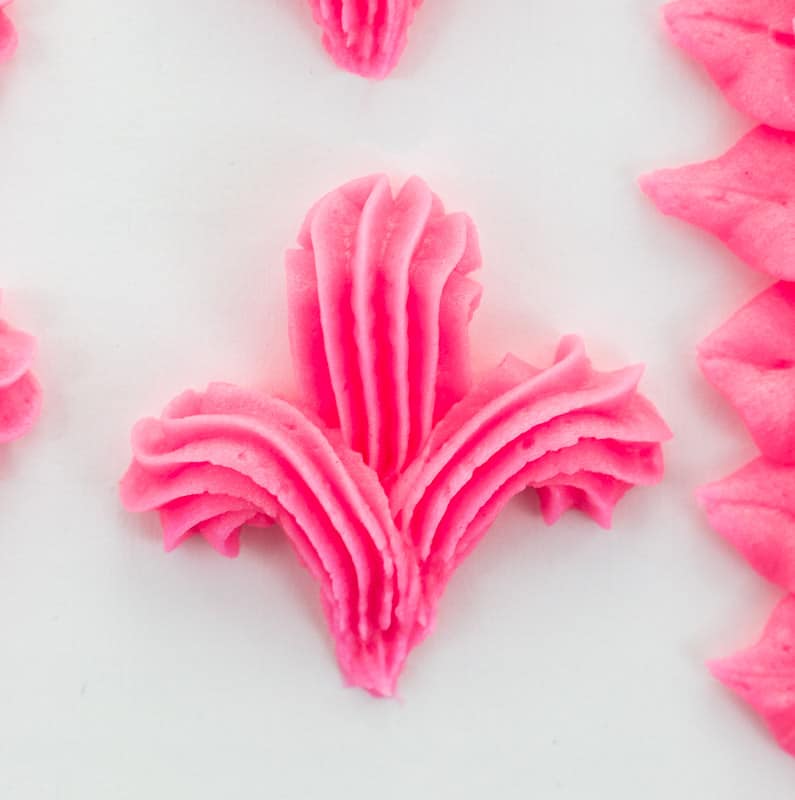
These are more than of a border that goes around the summit side of the cake and they're an old-fashioned, yet classic block piping blueprint that I think still looks actually elegant.
This i is a niggling more challenging, merely it's a like technique to making shells. You lot'll but be making them into a patterned shape.
With just a small corporeality of do, yous'll have these down in no fourth dimension.
For this border, you tin can use a Wilton 21 tip, or any star tip you feel comfortable with (but not a very large one).
To pipe the fleur de lis border:
- This edge is piped effectually the superlative outside edge of the cake.
- Brand a big shell in the eye and ii smaller shells, one on each side, that connect to the larger middle trounce.
- Hold the pipage purse at a 90-degree angle from the pinnacle, side of the cake. Clasp and allow the icing mound up into a big trounce and so release the pressure and pull the icing bag down.
- Next, brand a smaller vanquish to the left and to the right, only bend them in and connect them along the bottom of the larger shell.
- Make these all around the outside of the cake. It'southward a skillful thought to mark where you'll pipe these commencement, so they are evenly spaced.
Ruffle border:

This one is then fun. If you lot want to go super crazy, you could really exercise this all over the cake.
A tip to remember for this one is that you lot want the skinny end of the petal tip to exist the outside of the ruffle..that way y'all get the ruffle result.
For this edge, you tin can use a Wilton 104 or 103 petal tip and 12 round tip (or even smaller tip) for the pearl border that goes over it.
To pipage the ruffle border:
- For this border, employ a petal tip to get the ruffles and a round tip to piping a pearl border over the acme edge.
- Hold the pipe bag sideways against the cake and make sure that the skinny edge of the petal tip is facing downwards. (The skinny edge is what volition give it the ruffled look.)
- Y'all can either pipe each ruffle individually past making a closed 'u' pipage motion, or y'all can just pipe lines of ruffles by doing a continuous 'due west' movement across the bottom of the cake.
- Utilize a larger petal tip for even bigger ruffles.
- Pipe a pearl or scallop border over the top edge to give information technology a finished look.
Contrary shell border:
This one is probably the about challenging one on the list, simply one time yous exercise it a couple of times, you lot'll have it downwards.
This i is also my favorite. I LOVE how it looks on a block. Information technology looks complicated and people will be impressed, but it's actually not that complicated at all.
Information technology's essentially simply piping a trounce border, but in ii different directions (or angles). Don't worry, the video will show you how it's done.
For this border, you tin can employ a Wilton 21 tip, or an even smaller start tip if y'all want.
To pipe the reverse shell edge:
- Pipe this i the same as a regular shell border, but don't do it in a straight line.
- Each shell volition either come from the right, or the left and then stop in the eye.
- Concord the piping pocketbook at a slight angle over the top of the cake, squeeze to mound up a bit of icing, then release the pressure a bit and curve to either the left or right and come downward with the tail of the shell.
- Now do the aforementioned thing, simply come from the opposite side and and then come across in the middle where your previous beat out'due south tail was piped.
Helpful tips for Pipage Borders:
- Typically, the lesser border of a block is larger than the top border (if you have a superlative border at all). Yous definitely don't want the height border to be huge and bulky because it'll but brand the cake look top-heavy.
- Personally, I don't like putting my cake on a turntable while I'g piping borders. It just turns on me. I find it helpful to just fix the block on a tabular array to pipe the borders. Just brand sure to keep turning the cake as you get, or your borders will finish upwardly misshapen.
- Y'all don't have to brand a dissimilar type of buttercream just to pipe the borders. Nearly of the time y'all tin can apply the same type of buttercream you used to ice the cake. Unless you're pipage flowers etc., there'due south really no need to make a thicker or shortening-based icing simply for the borders.
- If you discover that your buttercream is a little as well soft though, you can always just add in a trivial more than confectioner's saccharide to thicken it up (if it's American Buttercream). If it'due south Swiss meringue buttercream, you could always just pop it in the refrigerator to firm up a bit more.
- Make sure if you're using a shortening-based buttercream, that you keep information technology covered in the bowl. Shortening-based buttercream will grade a crust over it and you don't desire that to mess with your piping.
- When you start pipe, showtime at the back because you'll probable never become a perfect seam where you lot started and ended.
FAQs for Pipe Borders:
My buttercream border won't stick to the block and keeps pulling upwardly when I lift up the pipage tip.
Your buttercream is likely likewise thick. Just add it dorsum to the bowl and add in a very pocket-size amount of milk or foam to thin it but a fleck. Be careful here, or you can very rapidly add together too much liquid and make it too thin.
I'm having trouble because my easily are shaky.
Oh yeah…welcome to my world. I have shaky hands too and I don't fifty-fifty potable caffeine. What helps me is that I use my other paw to stabilize my piping hand. You lot can see a bit of this in the video. It really does help.
As well, endeavour non to fill the pipe purse super full. It makes it harder to piping and gives you less control. Plus if your icing is too thick, it'll make your hands milk shake even worse. Just know that yous're not alone.
I messed upward in 1 spot.
You can practice three things:
-You can make that office of the block the back of the cake. (I'chiliad serious…that'southward a legit mode to fix it.)
-You can just scrape off that pocket-size surface area of the border and re-pipe it.
-You tin can scrape off the entire border and re-pipe the whole thing.
Which method you use will depend on how bad the goof is and the other design elements on the cake. If you've got a super smooth iced cake, it might not be worth taking the risk of messing that upwardly, only to fix a small area of the border.
As well, if you're using crusting buttercream (buttercream made with shortening), it'll grade this really thin vanquish over the icing, which works to hold it together if you have to scrape a small surface area of the border off.
So if you end upward needing to practise that, just expect almost xv minutes and let the icing chaff over a petty earlier you scrape that off, and then try scraping just that expanse off with a toothpick for more than precision.
This method will besides piece of work for an all-butter buttercream. Just pop it in the fridge and let it house upwards and it's generally easier to remove minor goofs that way when they're common cold.
If you have any more questions that I missed, simply allow me know in the annotate section below this post. I'thousand happy to help!
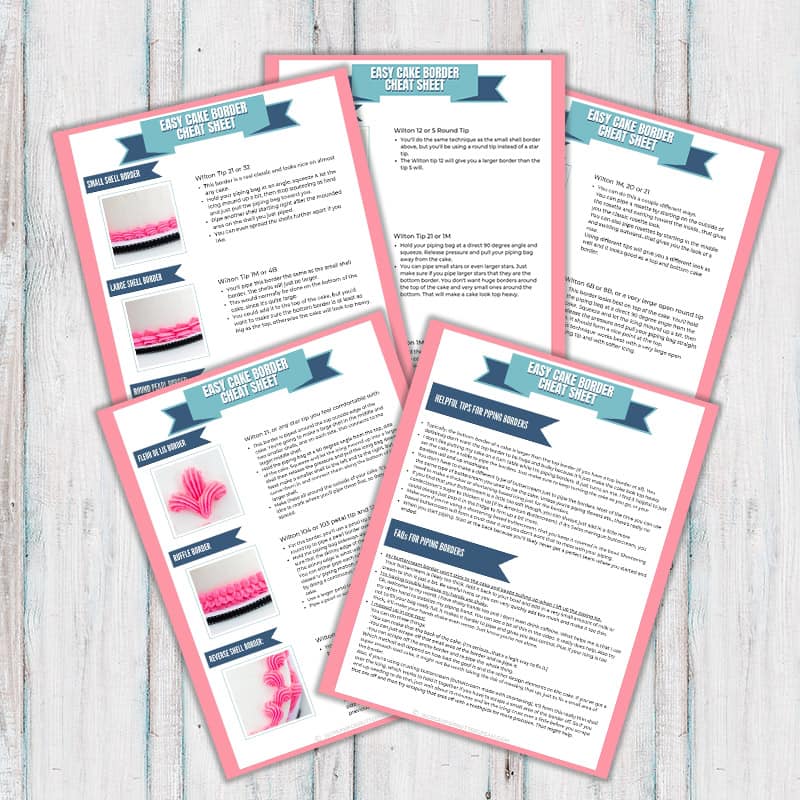
Printable Cheat Canvass:
Don't forget to download the printable crook sheet so you tin can reference it every bit you're piping your cakes!
Just click the push button below this graphic to automatically download it.
Video:
Don't Forget to Pin it Below!
Source: https://iscreamforbuttercream.com/12-simple-and-easy-buttercream-cake-borders/
Posted by: norristilvere.blogspot.com
0 Response to "What Are The Beads Around The Base Of A Cake Called."
Post a Comment